This method is recommended for mod developers looking to add support into MrCrayfish’s Furniture Mod. Unlike the configuration method, recipes are registered through coding and doesn’t require the players of your mod, to copy and paste lines of custom recipes into the configuration file. The hook into my MrCrayfish’s Furniture Mod, a jar file is to be added to your referenced libraries in your development environment.
Getting Started
Firstly, you will need to download the RecipeAPI jar file and this can be located at the bottom of the page. Now we can’t just simply reference the library and expect it to work. There are a few extra steps that need to be taken to set up your development environment correctly. I’m sure you are using the Forge API, if not, the RecipeAPI is not for your mod.
As most of you know, the Forge API uses the Minecraft Coder Pack to help decompile and recompile the code. Now unfortunately, a special folder not generated by default which we need is a folder called ’libs’. This folder is basically taken into consideration when you compile/build your mod, as the RecipeAPI is not suppose to be packed into your mod. Anyway, that should be enough information for us to get started.
Step 1
Now I’m sure this picture below if familiar to you, that is your Forge development environment. This is where we want to create the special ’libs’ folder, so do that now.

And then simply place the RecipeAPI jar file inside the libs folder.

Step 2
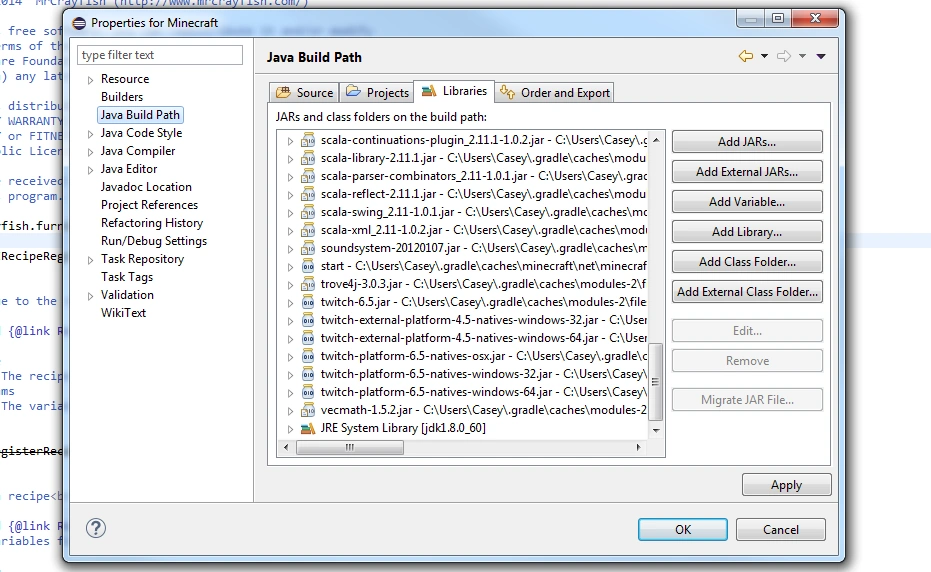
The next step we need to do is now reference the RecipeAPI into our IDE. In this tutorial, we’ll be using Eclipse. So you simply need to right click your project in Eclipse and go to Properties. Once that’s open, go to Java Build Path and click on the Libraries Tab.
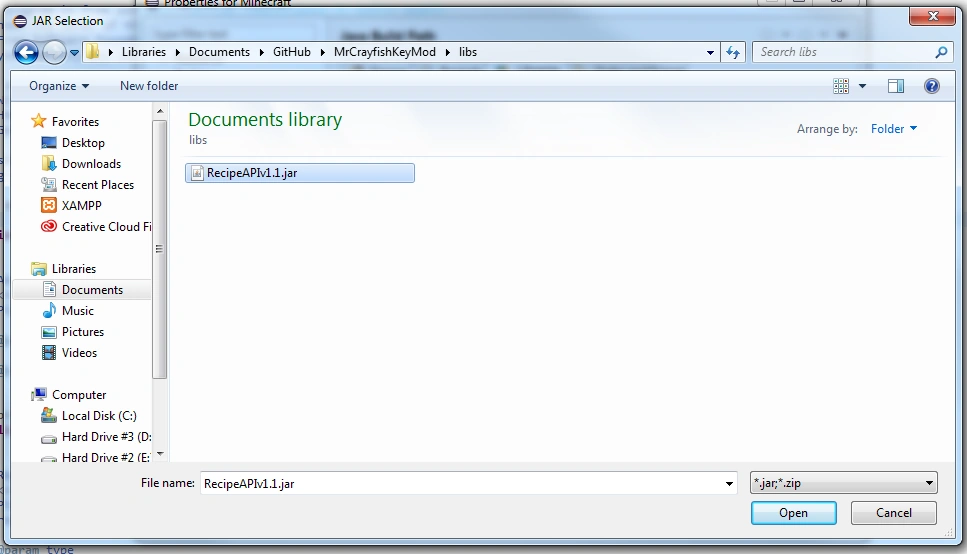
Now we want to add an external jar, which is the RecipeAPI jar file. So click on ’Add External JARs...’ then simply locate your ’libs’ folder we created just before and add the RecipeAPI jar from inside of it.

You should now see in the list of referenced libraries that the RecipeAPI jar is now added to it. Press OK and we have now successfully referenced the API to our development environment.


Step 3
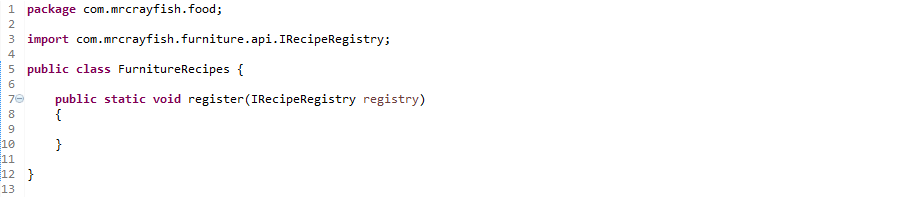
Finally we are ready to start adding in custom recipes. The API is designed to be really friendly to the developer and shouldn’t be confusing at all. The first thing you need to do is create a brand new class and we’ll simply call this FurnitureRecipes.class


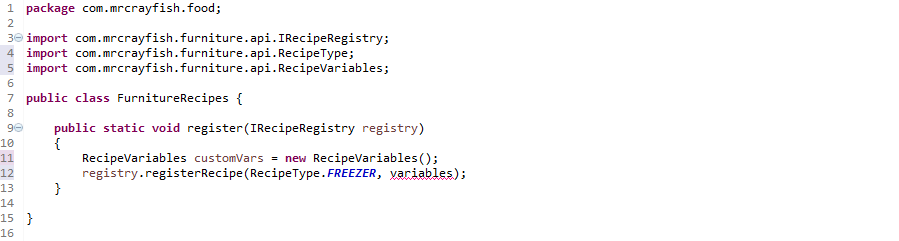
Inside this class, we need to create a specific method. This method will be invoked through code by the Furniture Mod so it can register your custom recipes. This method needs to be a public and static method that returns void. The name of the method doesn’t matter, but best practice would to be name it ’register’. For the parameters, we need to add only IRecipeRegistry, no more than that. IRecipeRegistry is from the RecipeAPI and is the class to handle registering. If these specifications are not followed correctly, your recipes won’t be registered. If you are unsure, the picture below shows the method you need to create.

Step 4
Now it’s time to register our first recipe! In this tutorial we will cover a custom Freezer and Blender recipe. Now each recipe requires certain variables for them to work. Below is a table addressing the required and optional variables for every recipe we can add.
| Type | Required Variables | Optional Variables |
|---|---|---|
| Freezer | Input, Output | None |
| Oven | Input, Output | None |
| Printer | Input | None |
| Minebay | Input | Currency, Price |
| Toaster | Input, Output | None |
| Chopping Board | Input, Output | None |
| Blender | Name, Heal, Ingredients, Colour | None |
| Dishwasher | Input | None |
| Washing Machine | Input | None |
| Microwave | Input, Output | None |
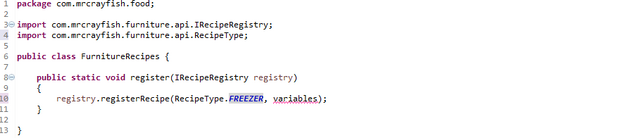
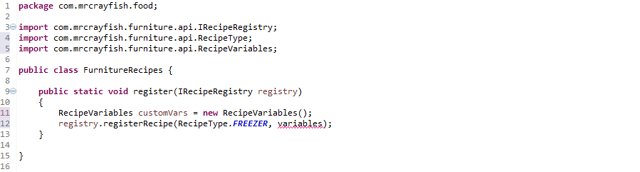
From this table we can see that the Freezer needs an Input and an Output for the recipe to be correct. So to start off, we need to call the method registerRecipe from IRecipeRegistry. This method takes in two arguments, the first one is a RecipeType enum. This is basically the type of recipe we are trying to register and in this case we want the Freezer enum, so we write RecipeType.FREEZER.

The second argument is the RecipeVariable and this is where we can define variables such as the Input and Output that are required for the Freezer recipe. So the first thing we to do is create an instance of RecipeVariables just above our call to register the recipe.
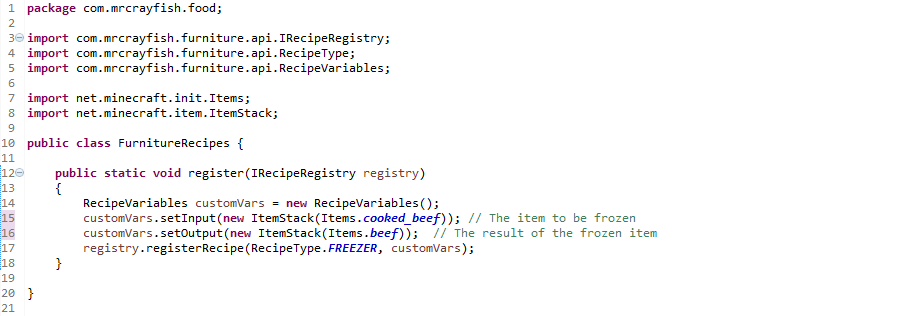
Now we need to set the Input and Output variables, so from the RecipeVairables instance, we call setInput and setOutput. Both these methods require an ItemStack object to fulfill the parameter of the methods. I’m sure you’re familar with the ItemStack class from Minecraft. For this example, we are going to simply make Cooked Beef turn back into Raw Beef (I know, super realistic). Once we’ve done that, simply reference the RecipeVairables instance as the second argument to the registerRecipe method.

There we go, our first custom recipe! That wasn’t too difficult was it. Now we are going to add a Blender recipe. Now as shown by the table we have four required variables, and this is the Name, Heal amount, Ingredients, and the Colour of the drink. Let’s start by first creating the RecipeVariables instance and setting our variables. Hopefully by now you are getting the gist of things. So we need to call from RecipeVariables, setName, setHeal, setIngredients, and setColour. For this case, we are going to add a simple flower drink (Again, super realistic).


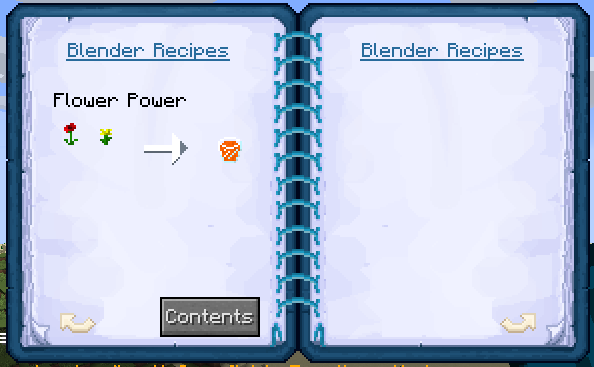
As you can see, I’ve set the name of the name of the drink to ’Flower Power’, the heal amount to 20 which is 10 hearts, the ingredients to one red and yellow flower, and finally set the colour to orange. Now we simply want to register this recipe, so we again call registerReicpe from IRecipeRegistry. We set the first argument to RecpeType.BLENDER and pass in the variables as the second parameter.


Step 5
Now were not done yet unfortunately. The last step we need to do is to send a message to the Furniture Mod to tell it "Hey, I need you to call my method for registering recipes". We do this by using Forge's Inter Mod Communication. Now it's quite simple, so don’t freak out about it. In either your init or postInit method of your mod class, we need call FMLInterModComms.sendMessage(). This takes in three parameters, the reciever Mod’s ID, the key, and the value. For the Mod ID, we want to input ’cfm’ as that is the Mod ID for the Furniture Mod. The key is ’register’ as defined by the Furniture Mod for registering recipes from mods. And finally, the value is the path to our method. For the path, you need to take into consideration of three things. The package the class is located in, the class name, and the method name. If done correctly, you should end up with something similar to the image below. (Remember the path is case sensitive!)


Congratulations, you have just hooked your first custom recipes into MrCrayfish’s Furniture Mod. By now, you’re probably wanting to see if this worked out. Well lets test it!


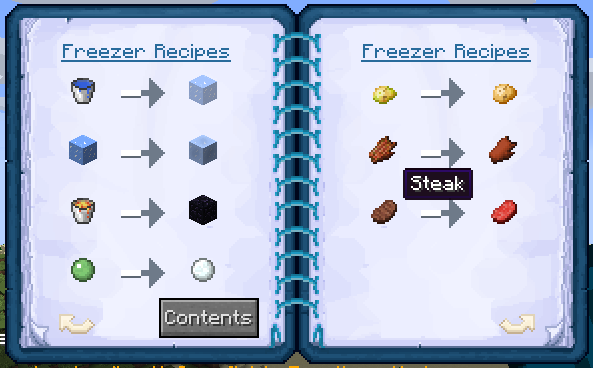
As you can see, inside the Recipe Book from the Furniture Mod, our custom recipes are displaying and that means they successfully registered. Happy hooking!
Just a quick note, if you want to run already compiled mods such as the Furniture Mod in your development environment, simply add ChickenCodeCore into your mods folder along with the Furniture Mod. This is just a faster method instead of compiling your code and running it in a normal environment.